Section "Metering Units"
Section Description
Any system for collecting, storing and analyzing data requires a reliable source of primary information. Within the IoT platform, this role is performed by Metering Units — key elements that ensure the integration of measuring devices and data transmission.
Purpose of section
The “Accounting Units” module is designed for centralized management of accounting units in the system. It provides the following features:
- Viewing the list of registered accounting units;
- Going to a detailed unit card;
- Adding new units;
- Editing parameters of existing units.
Section interface
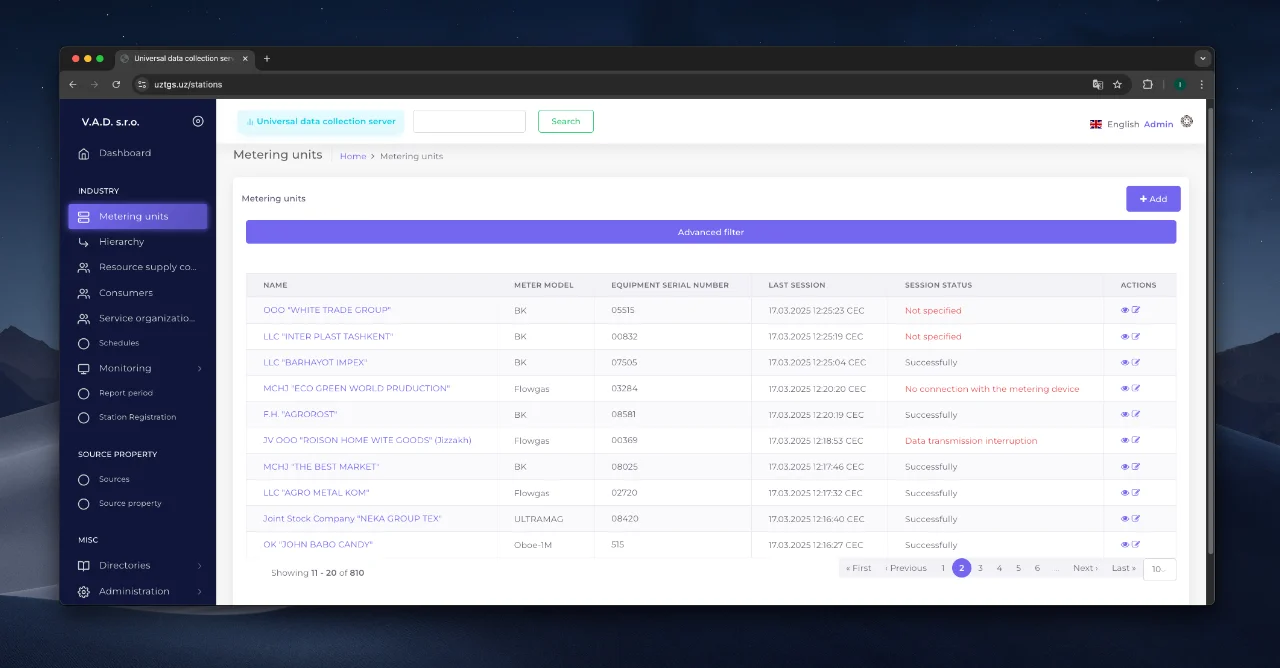
When entering the module, the user sees a list of all available metering units. The display of data depends on the assigned access level:
- Administrators receive a full list of units;
- Limited roles - only the objects assigned to them.
The module’s interface is intuitive: the main controls are located in the action bar, and the data table supports sorting by columns.
Working with an advanced filter
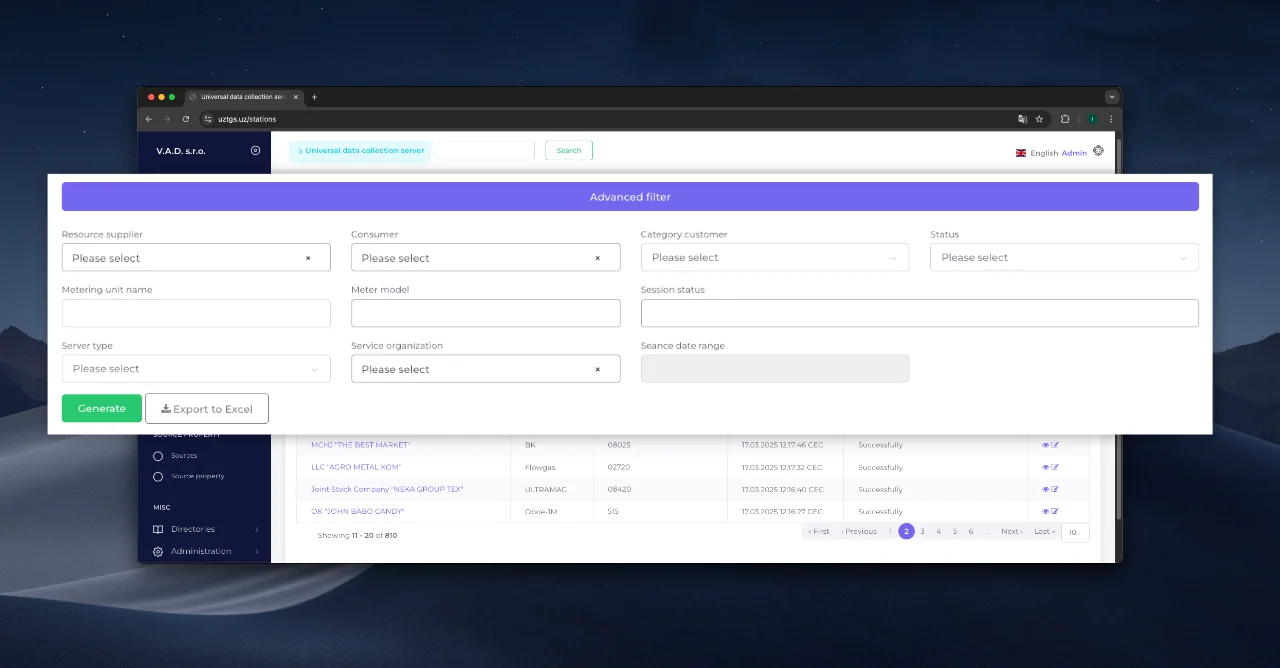
For quick search of units, the system has an advanced filter, which allows you to set combined selection criteria:
| Search criteria | Description |
|---|---|
| Resource supply company | Filter by supplier branch |
| Consumer | Search by linked consumer |
| Consumer category | Filter by classification (e.g. industrial/household, etc.) |
| Unit status | Working/sealed/repair, etc. |
| Meter model | Filter by meter type (e.g. “EK-270”) |
| Communication session status | Search by current connection (successful/no archive, etc.) |
| Range of communication sessions | Search by specified interval of communication dates |
The filter configuration is available via the button of the same name on the toolbar.
Data export and actions with units
After applying filters, the user can:
- Generate a list — display the results in a table.
- Export to Excel — download data for offline analysis.
To view detailed information about a unit:
- Find the object using a filter or in the general list.
- Click “View” in the “Actions” column — the unit card with detailed information will open.
Registration and activation of the metering unit
Important
To register a new Metering Unit in the system, you must have Account of at least the second level of the Access Levels hierarchy, with the ability to edit data.
Prerequisites
Before registering a metering unit, make sure that the following conditions are met:
-
A Consumer is registered in the system, to which the unit will be linked.
-
There is a Resource Provider branch for registering the unit.
-
The consumption indicator is configured in the “Schedule” section.
Metering unit registration procedure
To register a metering unit, follow these steps:
-
Go to the “Metering units” section.
-
Click the “Add” button (see the figure below).
-
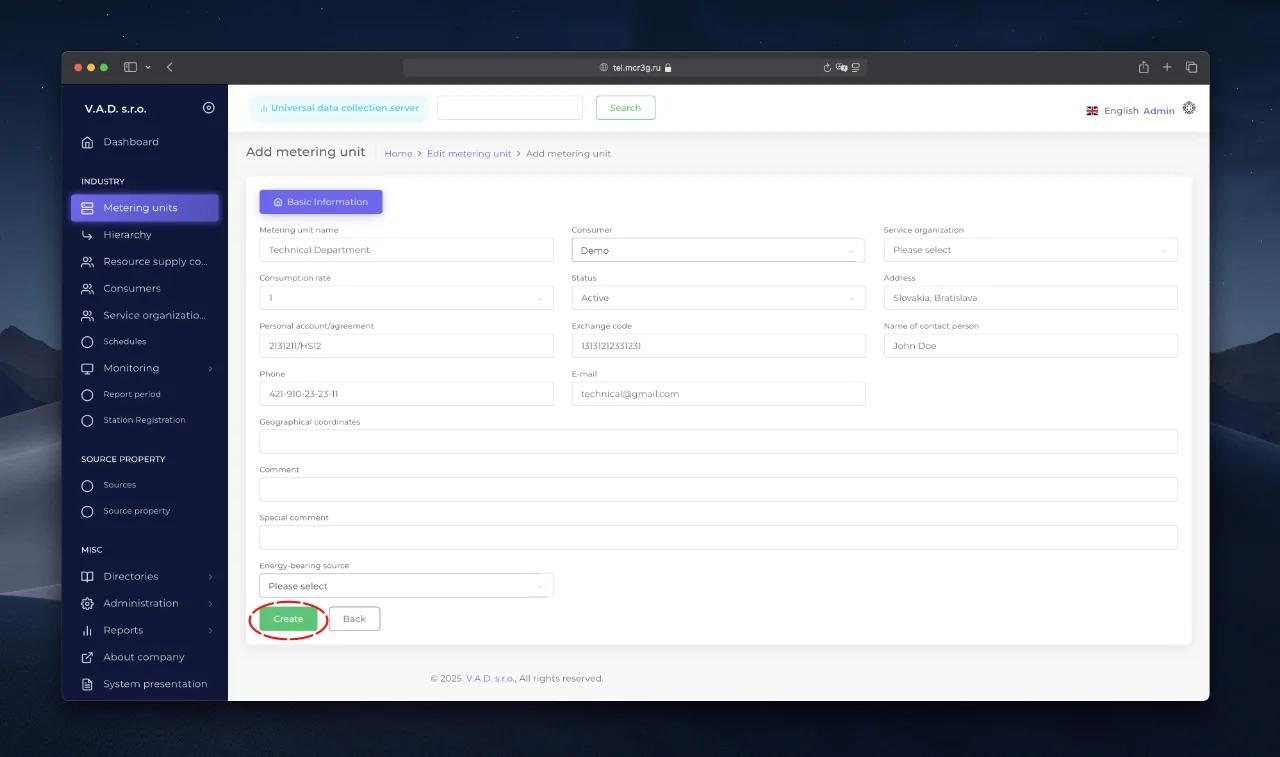
Fill in the required fields in the form that opens:
- “Metering unit name”,
- “Consumer”,
- “Consumption indicator” (see the “Schedule” section).
Filling in data
The registration information includes three categories:
- General data (name, consumer, consumption indicator, etc.),
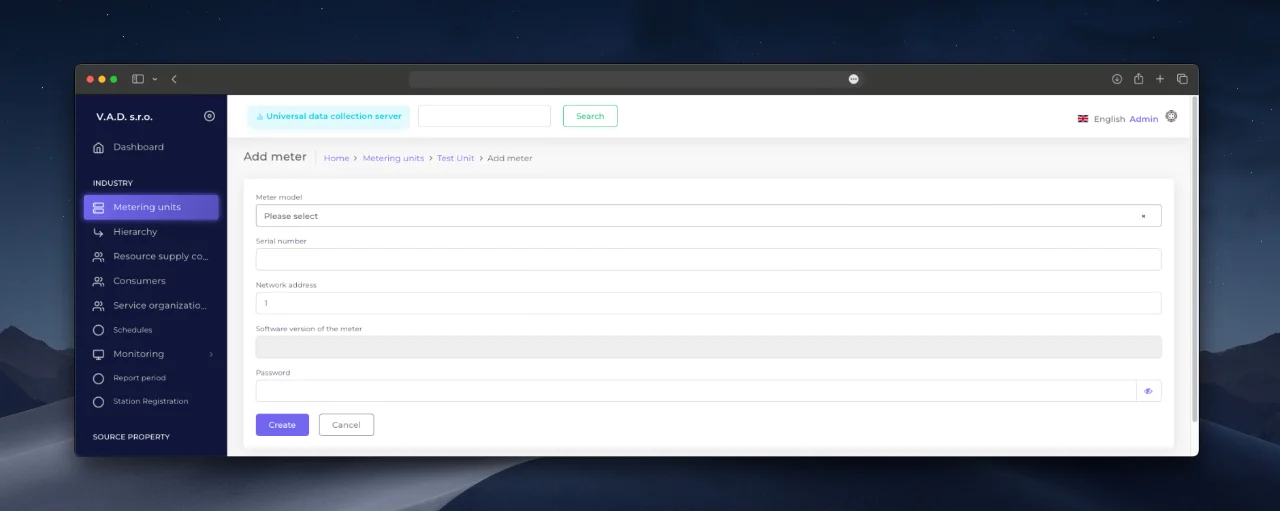
- Metering device information (model, serial number, network address),
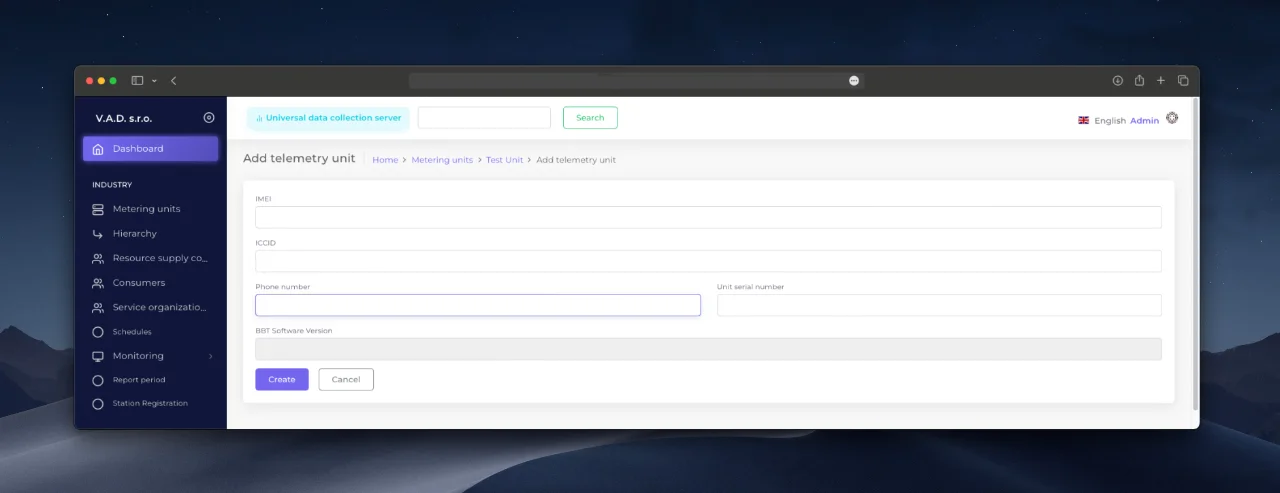
- Telemetry module data (system communication parameters).
Adding equipment
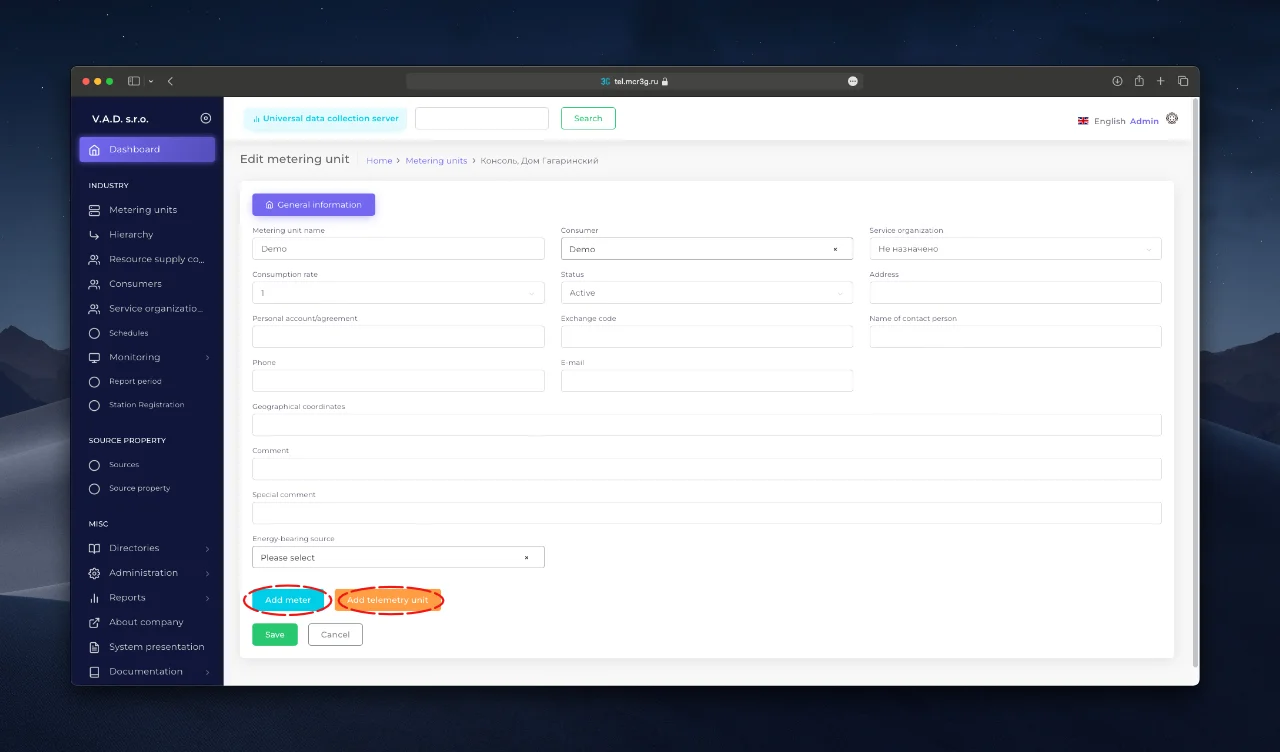
After filling in the general information:
-
Click “Add meter” (see the figure below) and specify the equipment data.
-
Click “Add telemetry unit” (see the figure below) to set up communication (see the description of the “Equipment” tab).
Editing an existing metering unit
To make changes:
- Go to the “Metering units” section.
- Open the unit card and click “Edit”.
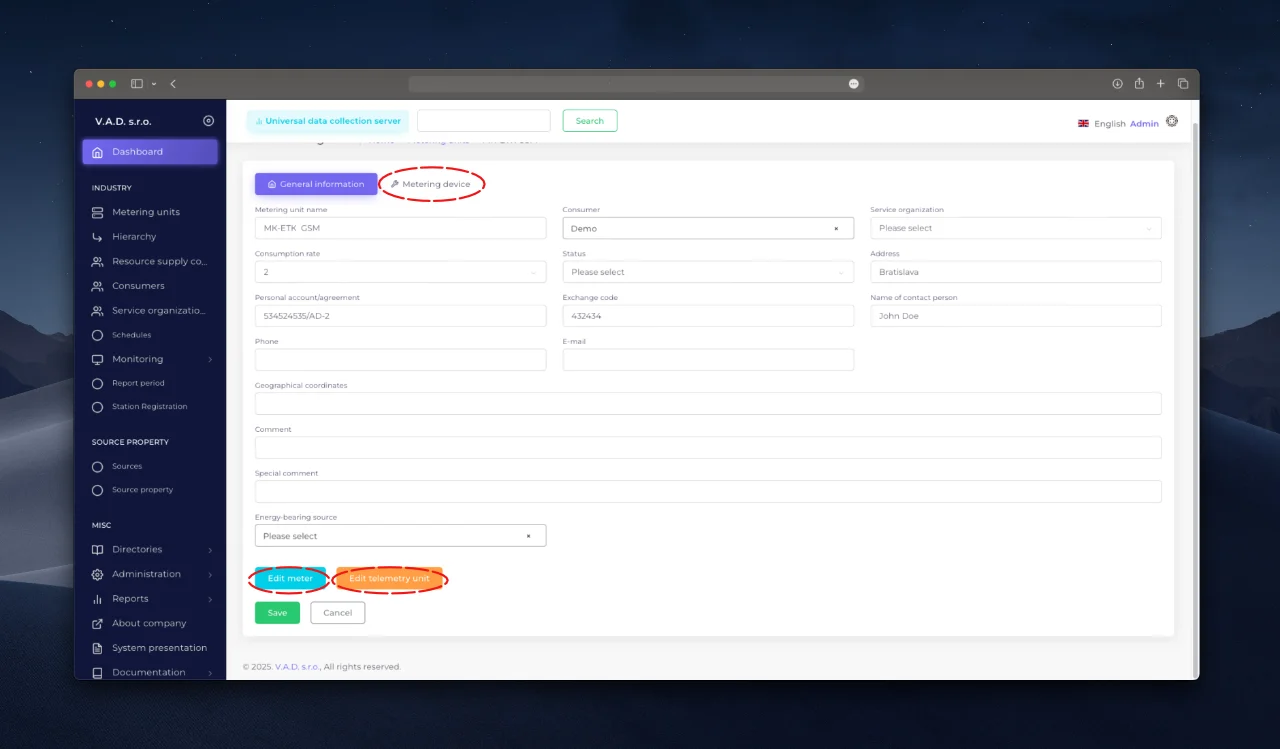
- The editing form includes:
- “Equipment” tab for viewing data,
- “Edit metering device” and “Edit telemetry unit” buttons.
Features of editing equipment
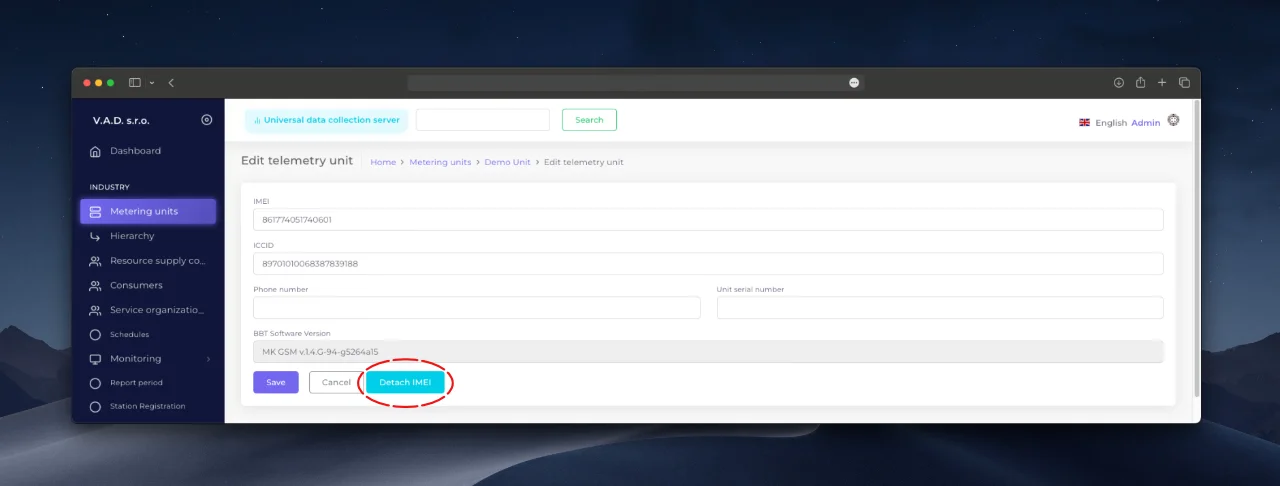
- The telemetry block editing form has a button “Detach IMEI”, which completely removes the block from the system.
- Changing other parameters does not require removing the equipment.
Saving data
- To save changes, click “Save” in the corresponding form.
- Exception: When deleting the telemetry block via “Detach IMEI”, all data must be re-entered upon re-registration.
Metering unit card
General description
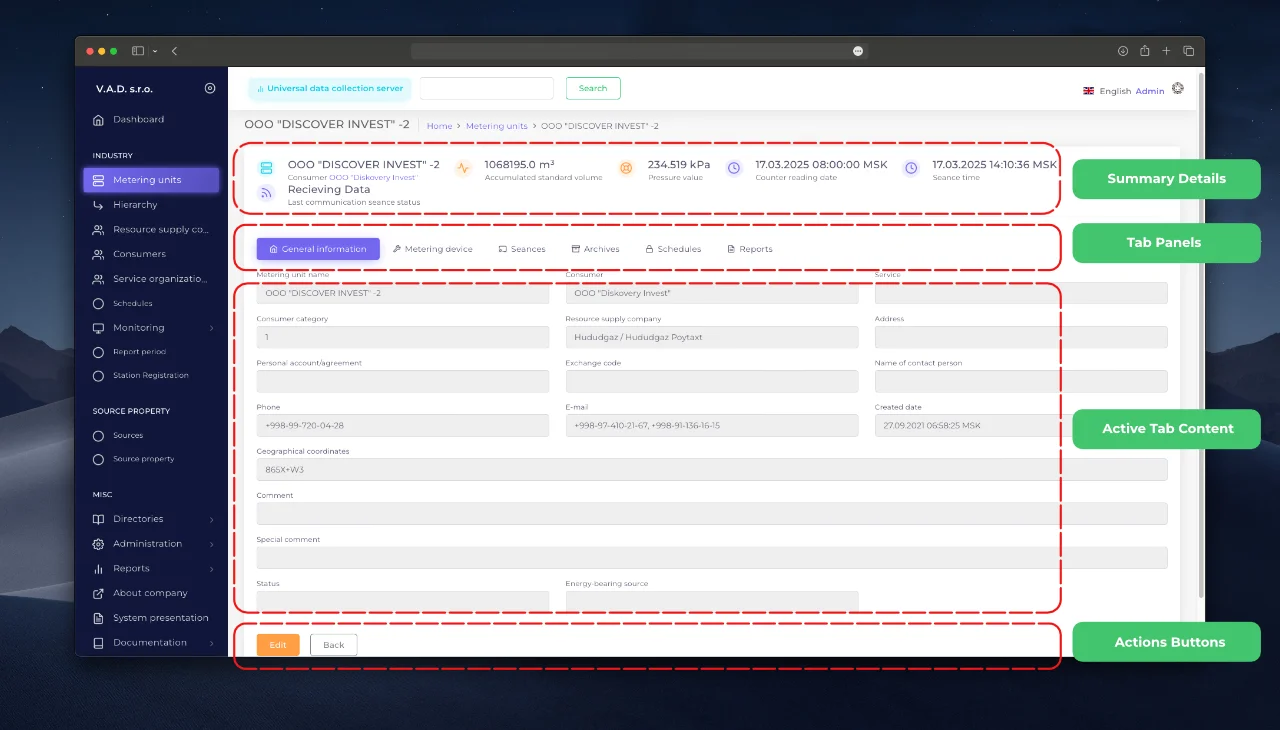
A metering unit card is a unique record in the data collection system containing general information about the metering unit and information about the installed equipment. The appearance of the card is presented below:
Important
From the metering unit card, the user can control the shut-off device (if they have the appropriate access rights and the equipment supports the function).
Card structure
The metering unit card consists of four blocks:
- Summary information
-
Accumulated volume of consumed resource (according to the last communication session).
-
Readings of the device sensors (depending on the equipment model).
-
Date and status of the last communication session.
- Tab panel of the “Metering units” section
- Allows you to view data depending on access rights and installed equipment.
- Tab content
- Data from the active panel tab is displayed.
- Functional buttons
- Controls for performing operations (settings, export, etc.).
Tab panel
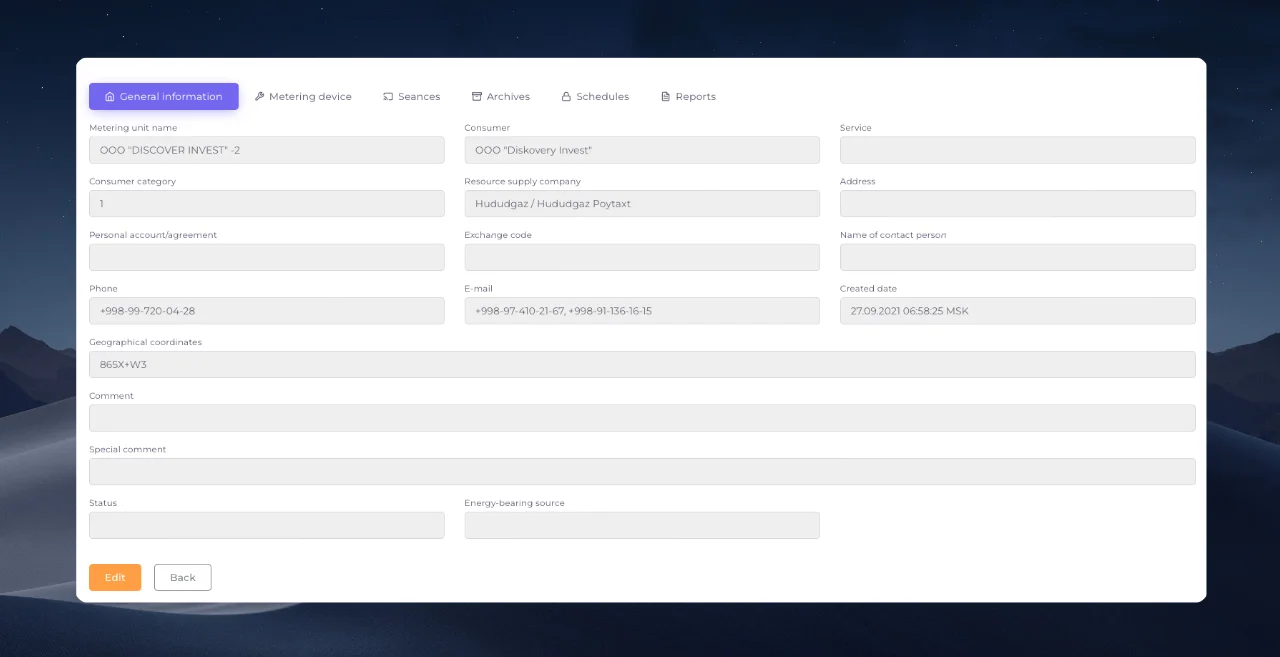
The figure above shows the available tabs:
- General information
- Equipment
- Communication session
- Reading archives
- Disconnection
- Schedules
- Reports
General Information Tab
Contains basic data (see the figure above):
-
Unit name, consumer, service organization.
-
Consumption indicator (basic schedule type from the Schedule section).
-
Installation address, personal account/contract, geographic coordinates.
-
Contact information of the responsible person, unit creation date, status.
-
Energy source (see the Energy Resource Parameter Management section).
Equipment Tab
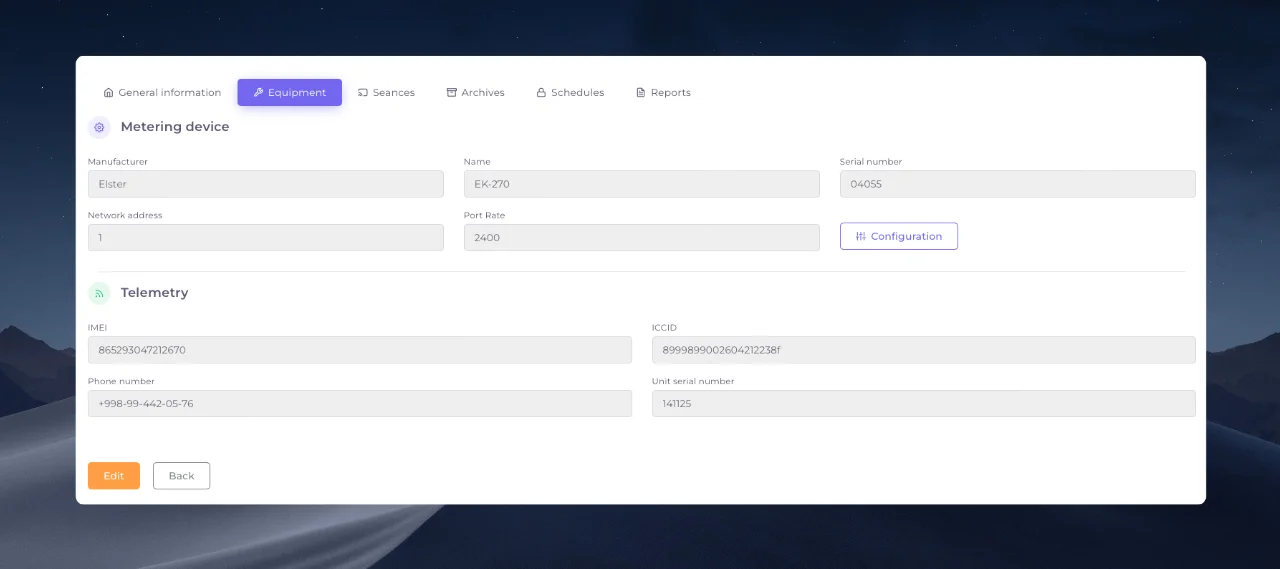
The tab interface is shown in the figure below:
List of fields and their descriptions by sections:
Meter
-
Manufacturer — specifies the manufacturer of the meter.
-
Name — contains the meter model.
-
Serial number of the meter — a unique factory number assigned to the meter.
-
Network address (system field) — a parameter used to connect to the meter.
-
Interface speed (system field) — the data transfer rate (in bits/s) when exchanging information between the meter and the Telemetry Unit.
Telemetry
-
IMEI — a unique 15-digit identifier of the Telemetry Unit.
-
ICCID — a unique code of the SIM card installed in the Telemetry Unit. The value is updated automatically.
-
Phone number — a mobile phone number assigned to the SIM card in the Telemetry Unit.
-
Unit serial number — a unique identifier of the Telemetry Unit assigned by the manufacturer.
Note
Fields marked as “system” are used for technical integration and equipment configuration.
Functionality of the “Configuration” button
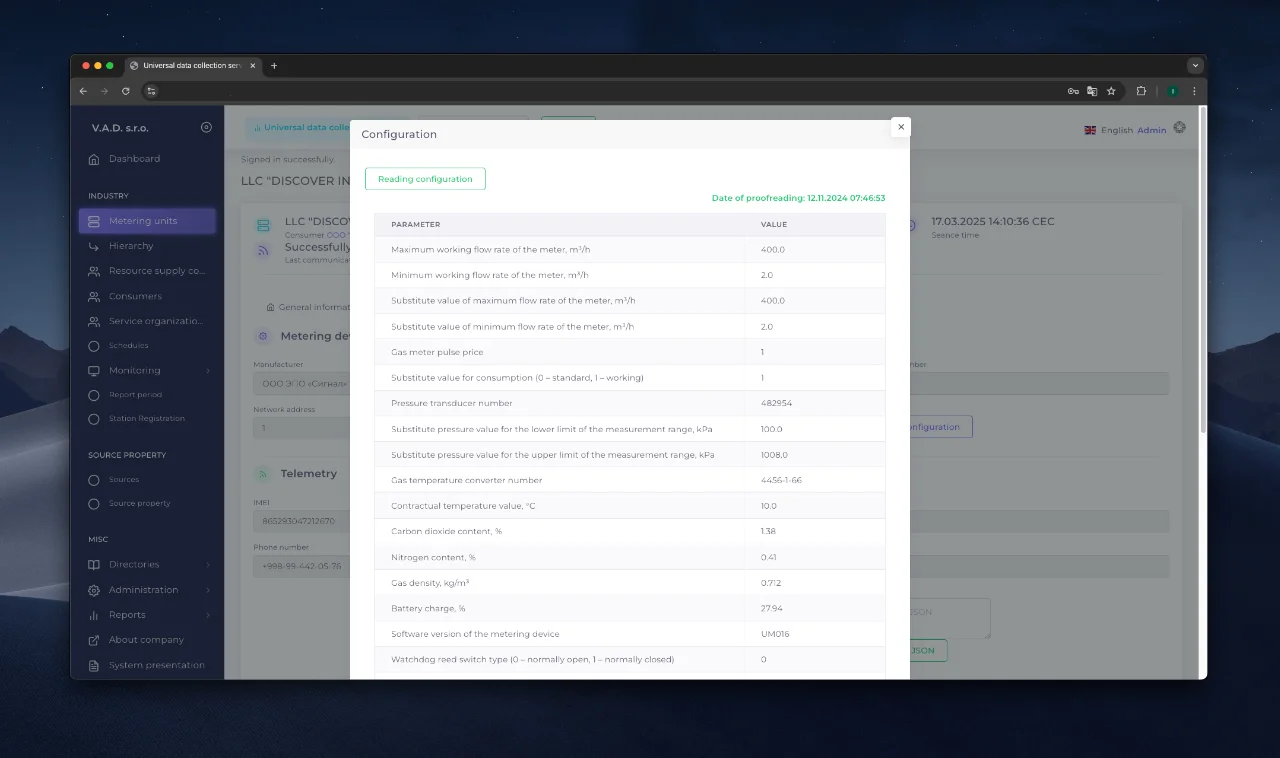
The “Configuration” button allows you to view the parameters entered into the metering device. The number of available parameters depends on the device model. An example of the configuration is shown in the figure below:
Displayed parameters
- Metering device operating modes activated in the current configuration.
- Settings related to metering of the consumed resource (e.g. compressibility factor, pulse price).
Parameters are configured in accordance with the requirements of the Resource Provider.
Procedure for viewing and re-reading the configuration
- Go to the “Metering units” section.
- Open the card of the required Metering unit.
- In the “Equipment” tab, click the “Read configuration” button.
- The collection system will re-read the data during the next communication session with the device.
Automatic parameter update The collection system updates the configuration automatically in the following cases:
- When changes are recorded in the “Changes” archive.
- On schedule (service update) — to update data in the monitoring systems.
Communication Sessions Tab
The Communication Sessions tab (see the figure below) provides information and diagnostic data on current, completed and planned communication sessions between the Metering unit and the IoT platform.
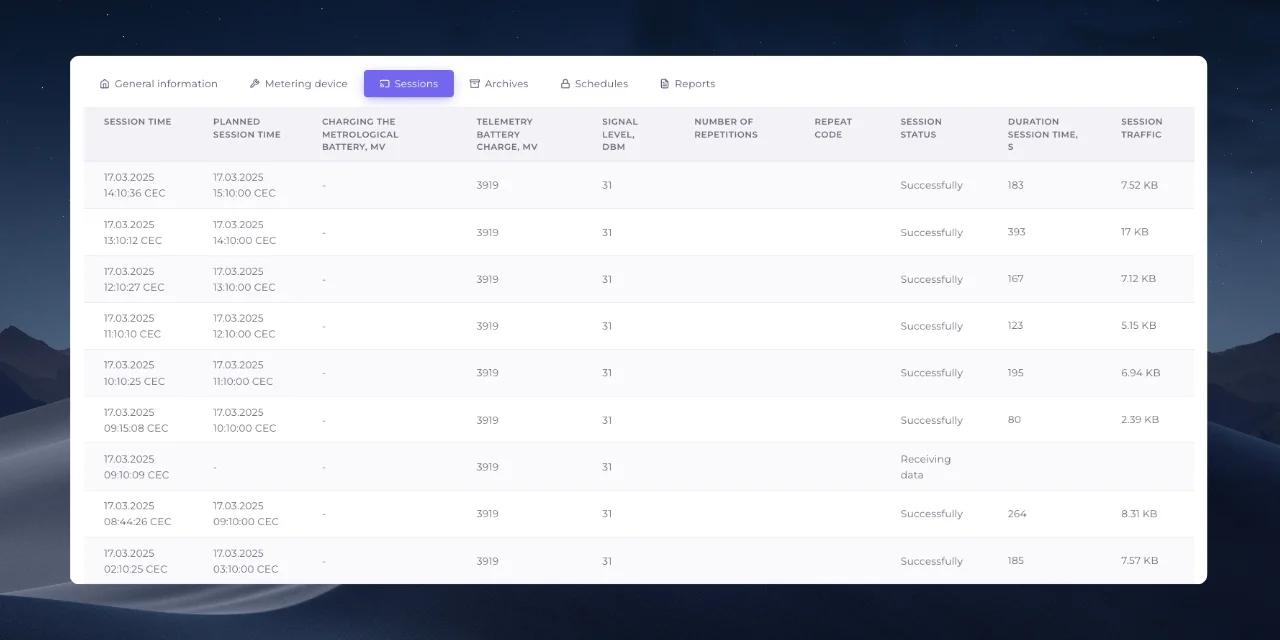
Key parameters of the tab:
-
Communication session time — date and time of connection with the IoT platform.
-
Planned communication session time — date and time of the next scheduled communication session.
-
Metrology battery charge — current charge level of the metering device battery (displayed if the device supports this function).
-
Telemetry battery charge — charge level of the telemetry unit power source.
-
Signal strength — quality of connection to the data transmission network (e.g. RSSI level for a GSM module).
-
Number of retries — number of attempts to establish a connection with the IoT platform (available for certain types of telemetry units).
-
Retry code — diagnostic code indicating the reason for the unsuccessful connection (e.g. weak signal, authentication error).
-
Communication session status — current connection status.
-
Traffic volume — approximate volume of data transferred during the session (estimated by the IoT platform; may differ from the telecom operator’s data).
Readings Archives Tab
The “Readings archives” tab of the Metering unit card provides access to structured data received from the metering device. The number of available tabs depends on the device’s functionality.
Typical archive tabs:
-
Hourly — archive with hourly detailing of energy resource consumption.
-
Daily — averaged data per day, corresponding to contract metering parameters.
-
Monthly — aggregated data for a month, reflecting total consumption within the billing period.
-
Events/situations — log of changes in the metering device’s operating modes (e.g. sensor failures, emergency situations, critical errors).
-
Changes — history of adjustments to device parameters (settings, configuration updates).
-
Communication sessions — service archive of the IoT platform, recording technical data on connections (time, status, errors).
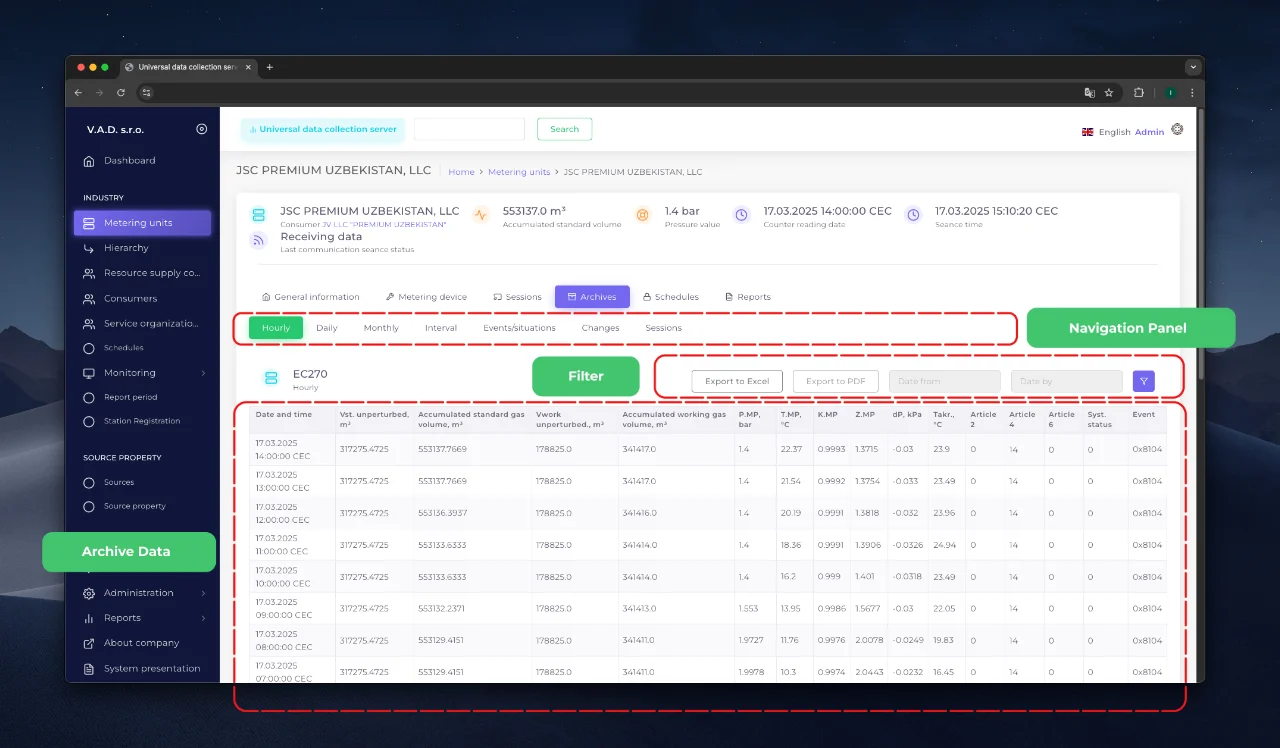
Tab structure (see the figure above):
- Navigation panel
- Allows you to select the archive type to display (via tabs).
- Data filter
-
Set the time range (beginning/end of the period).
-
Export data to supported formats (Excel, PDF).
- Archived data
-
Tables visualizing the selected data.
-
Data is updated in accordance with the settings of the Navigation panel and Filter.
Changing the data type via tabs
When you select a tab in the “Reading archives” section, the system automatically updates the displayed information in accordance with the selected aggregation period:
- “Daily” — data is averaged over contract days.
- “Monthly” — summary indicators for the billing month.
- Other tabs (for example, “Hourly”, “Events/situations”) work on a similar principle.
Filtering data by period
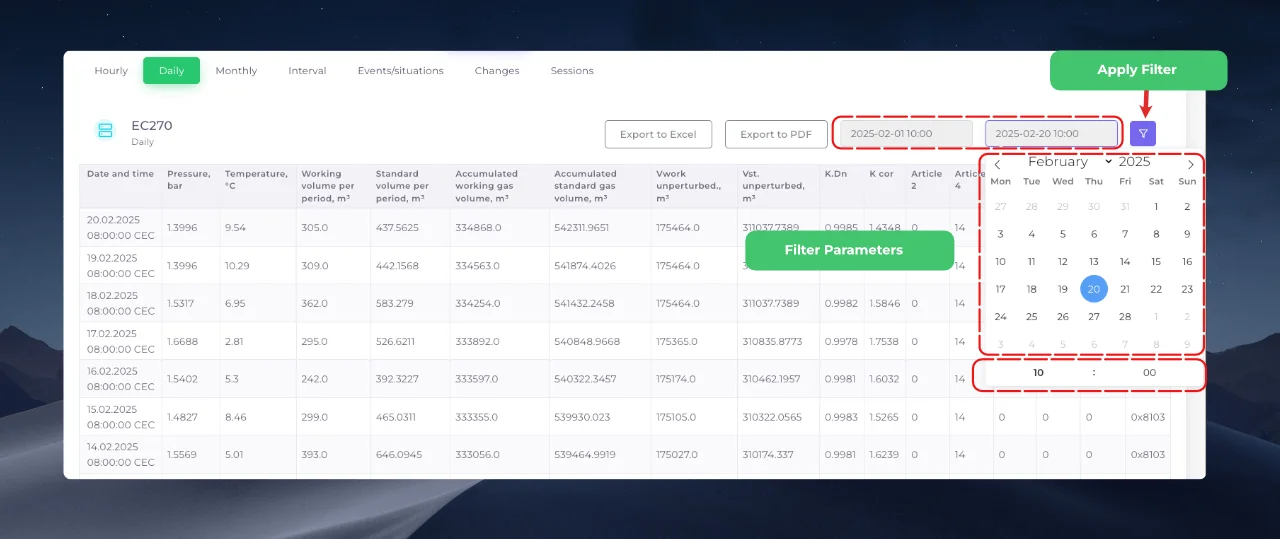
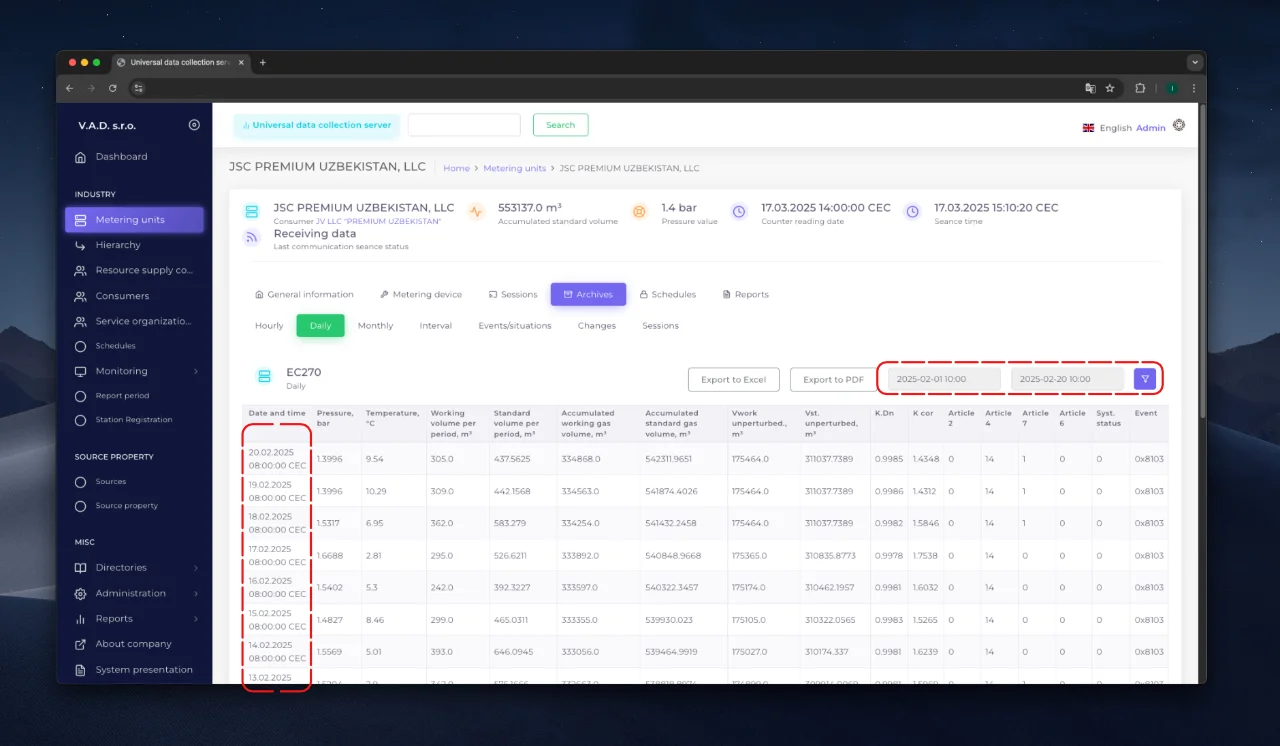
To limit the range of data displayed:
- In the navigation panel, specify:
- Date from — the start date of the period.
- Date to — the end date of the period.
- Click the «Apply» button icon.
Example:
When selecting the «Daily» tab and setting the range 01.02.2025–20.02.2025, the system will display only data for the specified 20 days (see the images below).
Shutdown Tab
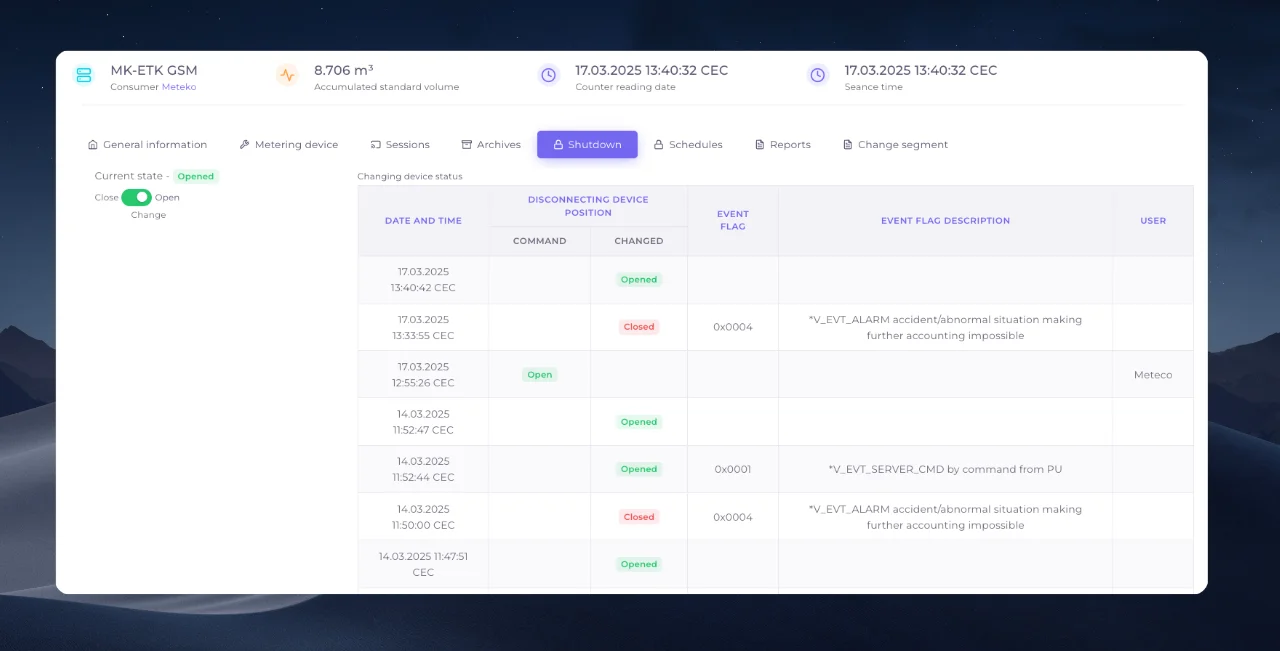
The interface for managing the state of the disabling device is presented below:
Tab functionality:
- Display the current device status (Closed / Open).
- History of operations (change time, initiator, previous/new status).
Changing the state:
- Move the switch to the desired position:
- “Close” — blocking the resource supply.
- “Open” — resuming the supply.
- The change will take effect after the next communication session with the telemetry unit.
Schedules Tab
The tab interface is shown in the figure below:

Functionality:
- Viewing current schedules for the metering node.
- Creating individual schedules (if you have access rights).
Ready-made templates are available in the “Schedules” section of the main navigation menu.
Reports Tab
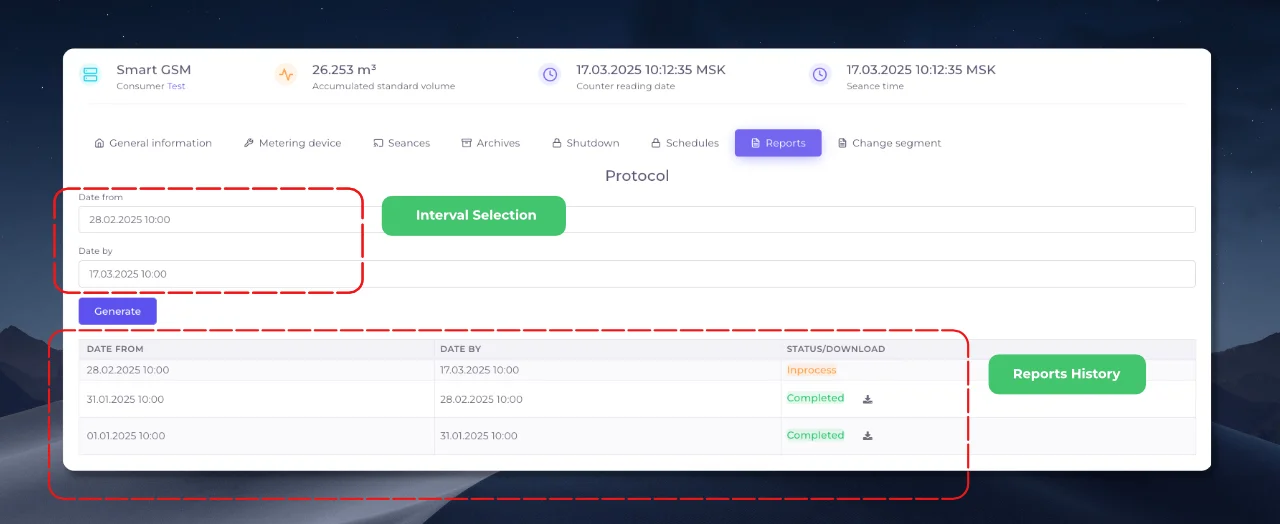
The tab interface is shown below.
Functionality:
- Generating a report on resource consumption for a selected period.
- Automatic data retrieval from archives supported by the metering device.
Typical archives for a report:
- Metering device configuration (current settings).
- Daily archive (averaged data per day).
- Event/situation archive (changes in operating modes).
- Change archive (history of parameter adjustments).
Tab structure:
- Interval settings:
- Specify the period taking into account contract days (start and end dates).
- History:
- List of previously generated reports (creation date, status, download link).
Report generation instructions:
- In the “Interval settings” section, set the period.
- Click the “Generate” button.
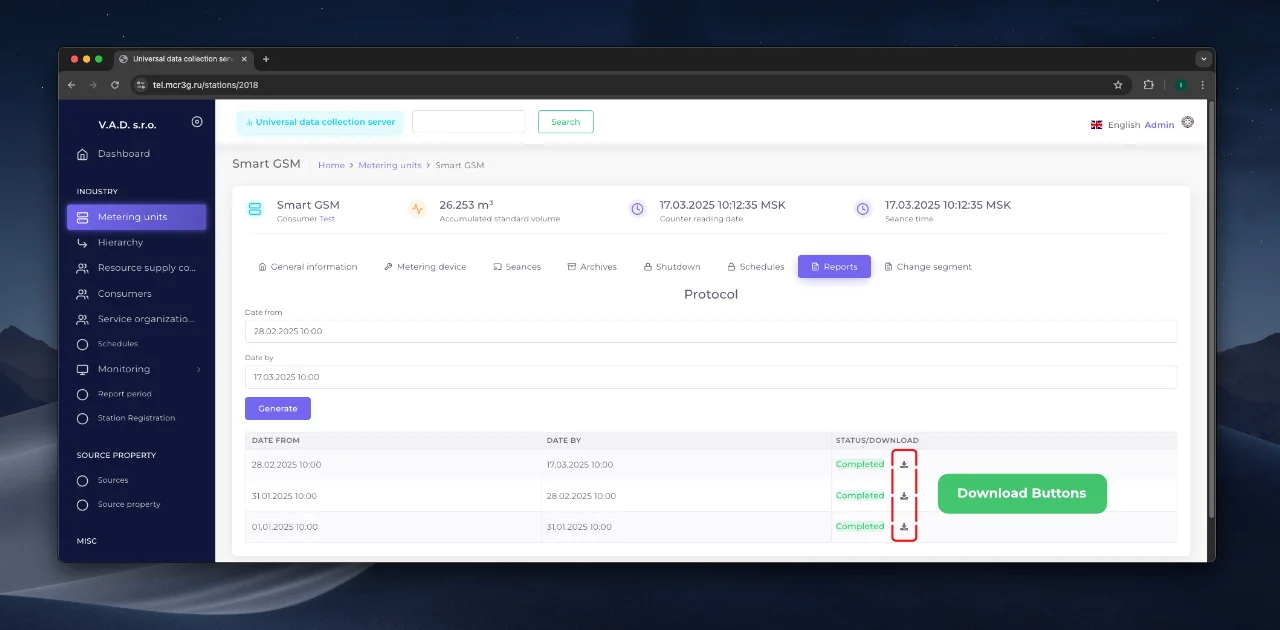
- Wait for the “Completed” status in the “Status/Download” column.
- Click “Download” to download the file to your device.
Note:
- The report is saved in PDF format.
- To re-upload, use the saved templates from the “History” section.